X2 Device setup
HUBBOX Connect X2 Installation and Connection Guide
The HUBBOX Connect X2 is a powerful industrial gateway designed for remote access and Industry 4.0 applications. Please follow the instructions below for a correct hardware setup.
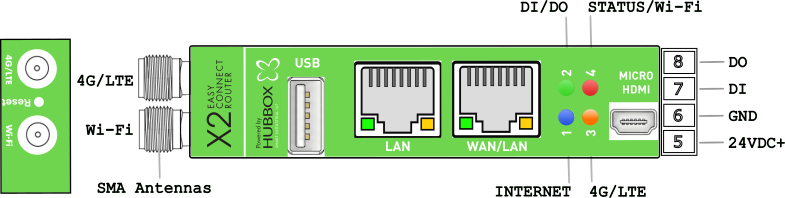
Important Note: The HUBBOX Connect X2 device does not support 4G/LTE. However, it does have an SMA connector for the antenna. Please plug the Wi-Fi antenna into the SMA connector labeled "Wi-Fi"; otherwise, your Wi-Fi connection will be weak or non-existent.
1. Device Interface and Connector Structure
The hardware interface consists of the following components:
- Antenna Input (SMA): Located on the far left, dedicated for Wi-Fi antenna connection.
- USB Port: Used for external device integration or specific configurations.
- Ethernet Ports:
- LAN: Dedicated for local network/machine connection.
- WAN/LAN: Configurable as an internet input or an additional local port.
- Video Output: Micro HDMI port for direct monitor access.
- Micro SD Slot: Located in the DIN rail mounting section. Supports up to 256GB for additional storage.
2. Power and I/O Connections
The terminal block on the right side handles power and digital signaling:
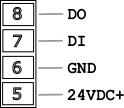
- Pin 8 (DO): Digital Output.
- Pin 7 (DI): Digital Input.
- Pin 6 (GND): Ground/Chassis connection (-).
- Pin 5 (24VDC+): Positive power input (+).
3. Status LED Indicators
The device features four multi-colored LEDs to monitor system status in real-time:
| LED Color | Steady ON (Solid) | Flashing (Blinking) | OFF |
|---|---|---|---|
| Blue (Internet) | Internet & Socket connected | Internet OK / Socket Missing | No Internet connection |
| Green (DI / DO) | Input Inactive & Output ON | Input is Active (300ms) | Input Inactive & Output OFF |
| Red (Status) | System is running | VPN is connected | System is Offline |
| Orange (4G/LTE) | 4G Module Present | 4G Connection Active | No 4G Module (N/A) |
4. Installation Steps
- Power Connection: Connect a stable 24V DC supply to Pin 5 (+) and Pin 6 (-).
- Internet Access (WAN/LAN): Connect your internet uplink cable to the WAN/LAN port.
- Internet Access (Wi-Fi): To use the factory "hbbx" profile:
- Set your router's SSID to
hbbx. - Set the Wi-Fi password to match your device's Serial Number.
- Set your router's SSID to
- Local Connection: Connect your computer to the LAN port for configuration.
- Verification: A solid Blue LED confirms the device is successfully online.
Management Access:
Default IP:
Credentials:
Default IP:
192.168.24.254Credentials:
hubbox / hubboxHUBBOX Technical Support | www.hubbox.io