JAVA Runtime Install
Eclipse Temurin OpenJDK 21 Installation Guide
To ensure HUBBOX's world-class Industrial IoT, OT/IT, and 4G/LTE/5G Router solutions transmit data seamlessly, with high performance and security in your industrial network, a 64-bit Java Runtime (JDK) environment is required on your system. In this guide, you will find the step-by-step installation of the Eclipse Temurin OpenJDK 21.0.2+13 (x64) package, which complies with global industrial network standards.
JAVA_HOME variable and PATH routes during installation is of critical importance for HUBBOX devices (IoT Gateway, Router, etc.) to operate seamlessly in the background and for the "Plug-and-Play" feature to be active.Step-by-Step Installation Instructions
1. Launching the Wizard
Run the OpenJDK21U-jdk_x64_windows_hotspot_21.0.2_13.msi file you downloaded. On the setup screen that appears, take the first step of your industrial network connection infrastructure by clicking the Next button to start the process.
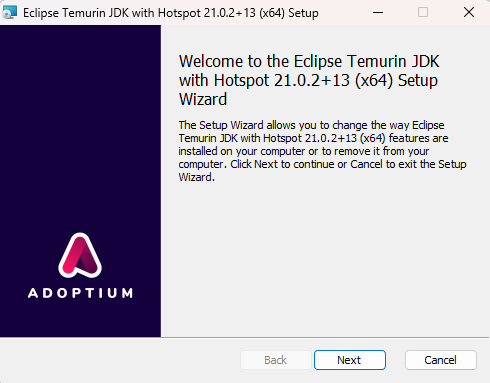
2. Feature Selection and Activating All Components
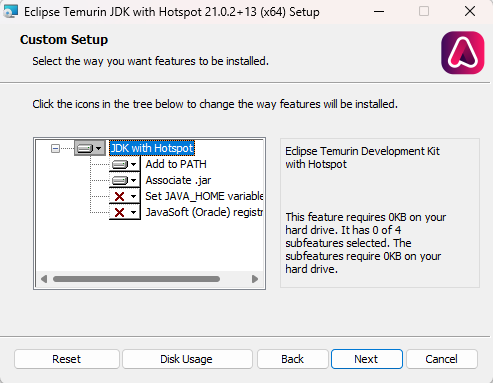
The components you want to install are listed on the Custom Setup screen. Click on the main component option to ensure the installation is completed seamlessly and that HUBBOX tools (Industrial Network software) can read the system variables correctly.
Select the "Entire feature will be installed on local hard drive" option from the drop-down menu. This prevents data bottlenecks by ensuring all sub-components of the JDK are installed as a full package on your local disk.
3. Checking JAVA_HOME and PATH Variables
After completing the selection, verify that all icons in the list have become active. To allow HUBBOX hardware to communicate with your system, ensure especially that the following two main features are selected:
- PATH Add to PATH: Ensures that Java commands are instantly accessible from the system terminal (CMD/PowerShell).
- JAVA_HOME Set JAVA_HOME variable: Minimizes IT/OT integration time by allowing HUBBOX services to automatically detect the Java directory.
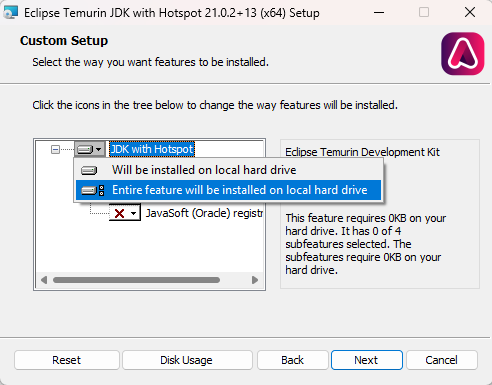
Set JAVA_HOME variable option appears disabled (with a red X icon) in the default settings, you need to click on it and change it to "Will be installed on local hard drive".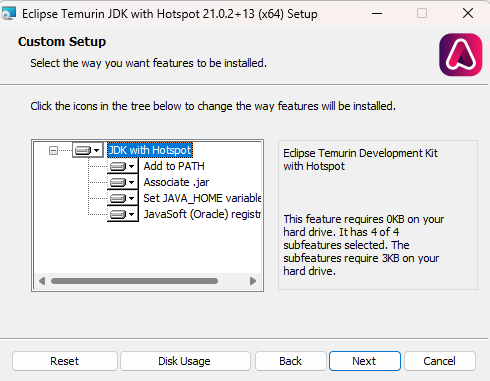
4. Completing the Installation
After selecting all sub-features (4/4 subfeatures selected), click the Next and then Install buttons to finish the installation. Once the setup is complete, you can exit the wizard by clicking the Finish button.
Installation Verification Test (Pre-Industrial Connection)
To verify that the installation was successful and the system is ready to communicate with HUBBOX router devices, open the Windows Command Prompt (CMD) and run the following commands:
Java Version Check:
java -version Expected Output: openjdk version "21.0.2" 2024-01-16 LTS
JAVA_HOME Variable Check:
echo %JAVA_HOME% Expected Output: C:\\Program Files\\Eclipse Adoptium\\jdk-21.0.2.13-hotspot\\